How To use Photoshop eBook Cover Action Scripts and Templates
Photoshop eBook Cover Action Scripts User Manual
Just in case you are new to Photoshop, here's step-by-step guide on how to use the Photoshop ecover action scripts provided by ecover-templates.com.
You need Photoshop to run the actions.
Adobe Photoshop 30 days free trial can be download from here
Step 1- Loading The EBook Cover Action Into Your Photoshop
1-Fire up Photoshop and and make sure the Actions palette is visible. If not, go to main menu bar, Window > actions to visualize it.

2- Open the Actions palette, click on the little triangle button as shown below

3- Click on the "Load Actions..." from the drop down menu to locate and load the action script (ATN File) that you had download previously.

Then, you can see the ebook cover action get listed in your Action palette.
Step 2- Using the Photoshop EBook Cover Action Script
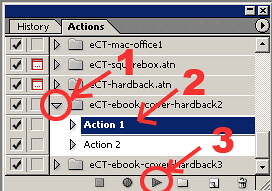
First, Create a blank template by
1- Select the action of your desire
2- Click on Action / Step 1 from the dropdown menu
3- And click on the Play button as shown
below.

Give a few seconds for the action to execute.
This creates blank flat template. You may now start filling the template with your own design.

I strongly suggest you to make each of your graphic and text into separate
layers. This will make your work much easier in the process.
I come up with this

Second, Transform your flat 2D into stunning 3D ebook cover
When you're done with with your design,
click on the Action 2 and then the play button

Wait a few seconds for the action to execute thoroughly before start to crop and resize the image into your desire size. Then save for web.
The final result:

That's how to use the action script, but how about the templates?
How To Put ECover Templates Into Action
After downloading the templates pSD files into your computer, you need to unzip it using zip unzip software. You can get 45 days free trial version of winzip here.
1- Load the PSD file into your Photoshop as shown in Step 1 above.
2- Choose your action from the Action palette
3- Skip Action 1 and play the Action 2 as shown below.

Just in case you are new to Photoshop, here's step-by-step guide on how to use the Photoshop ecover action scripts provided by ecover-templates.com.
You need Photoshop to run the actions.
Adobe Photoshop 30 days free trial can be download from here
Step 1- Loading The EBook Cover Action Into Your Photoshop
1-Fire up Photoshop and and make sure the Actions palette is visible. If not, go to main menu bar, Window > actions to visualize it.

2- Open the Actions palette, click on the little triangle button as shown below

3- Click on the "Load Actions..." from the drop down menu to locate and load the action script (ATN File) that you had download previously.

Then, you can see the ebook cover action get listed in your Action palette.
Step 2- Using the Photoshop EBook Cover Action Script
First, Create a blank template by
1- Select the action of your desire
2- Click on Action / Step 1 from the dropdown menu
3- And click on the Play button as shown
below.

Give a few seconds for the action to execute.
This creates blank flat template. You may now start filling the template with your own design.

I strongly suggest you to make each of your graphic and text into separate
layers. This will make your work much easier in the process.
I come up with this

Second, Transform your flat 2D into stunning 3D ebook cover
When you're done with with your design,
click on the Action 2 and then the play button

Wait a few seconds for the action to execute thoroughly before start to crop and resize the image into your desire size. Then save for web.
The final result:

That's how to use the action script, but how about the templates?
How To Put ECover Templates Into Action
After downloading the templates pSD files into your computer, you need to unzip it using zip unzip software. You can get 45 days free trial version of winzip here.
1- Load the PSD file into your Photoshop as shown in Step 1 above.
2- Choose your action from the Action palette
3- Skip Action 1 and play the Action 2 as shown below.


No comments:
Post a Comment